
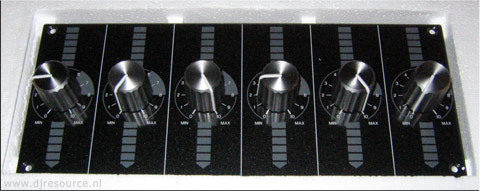
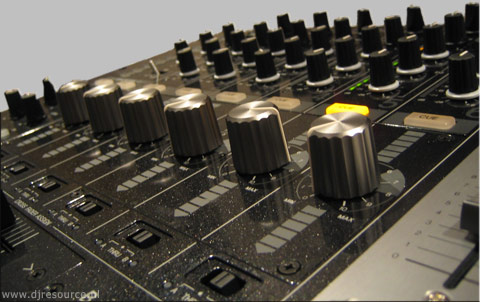
Pioneer DJM-1000 Rotary Kit DJM-1000 faders change to Rotaries
Submitted by LeadThis content is © 2005-2025 The DJResource
|
WARNING
By following the steps of this editorial you void your warranty. When your warranty is still valid this may only be done by an official Pioneer Service Center.
Check www.pioneer.eu to get in contact with the Pioneer Head Office in your country. They can give you detailed information who to call. |
One of the cool features of the DJM1000 is that you can easily change the standard Fader Panel by a Rotary Panel in a few minutes. If you are in just a little doubt you shouldn't perform this tweak : Leave it to the pro's instead.
The Rotary kit can be purchased at any official Pioneer dealer worldwide using the product type number : Pioneer DJC-1000RV. A Posidrive screwdriver and this Rotary Kit are the only things you need, no extra tools or materials are required. All electronical connections are done by connectors.
| 1. Unscrew the Fader Panel The Faderpanel can be removed entirely in 1 piece. So there is no need to remove all the fader knobs, just unscrew the 4 screw that hold the panel on the mixer. You can find these 4 screw in the corners of the panel in which the faders are placed. The screws at the ends of the fader only hold the fader on it's place and there is no need to loosen these. |
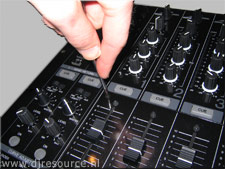 |
| 2. Lift the Fader Panel After unscrewing the 4 screws in the corners of the fader panel it lays loose on it's place. When you grab the 2 outer fader knobs and gently lift it, you can grab the fader panel and remove it. Be careful : The panel is still connecter with the mixer by a couple of wires, so only tilt the panel instead that you lift it out of it's place and than follow the next step. The connectors are grouped together, two at a time. So Channel 1 and 2 are next to eachother (on the left side, looked at the DJs position), the same goes for Channels 3 and 4, and the final set of connectors are channels 5 and 6. So each channel has it's own connector right below the fader, when viewed from the normal DJs position, from left to right is 1 to 6. |
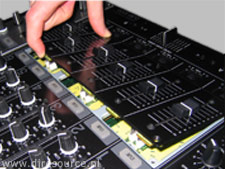  |
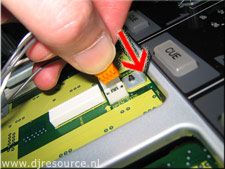
| 3. Loosen the 6 connectors The wire have a length of about 10 cm. Each fader has it's own connection to the mixer by a 4-pin mini connector. This is used for the VCA control and the fader start signal. |
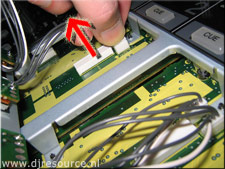 |
| 4. Swap the panels and Reconnect If you've loosened all 6 cables you can remove the fader panel and replace it with the rotary panel. You have to connect all cables of this panel with the terminals inside the mixer. Watch carefully that you connect the proper channel to the proper terminal inside the DJM1000. Each of the 6 connectors have the terminal in the same direction, the connector only fits in one way so DO NOT FORCE IT, it should get connecter fairly easy. |
 |
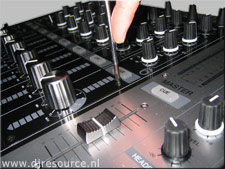
| 5. Mount the Rotary Panel After all connections are made you can place the panel in it's final position and you can lock it to it's place by using the screw that held the regular fader panel to its's place. |
 |
 |
|
What do you think about Pioneer DJM-1000 Rotary Kit ??
Related Blog Posts
Random Images

Please consider making this website possible by disabling your Ad Blocker.
Or become a Gold Member, they don't see ads.
There are 10 Comments


 very nice , buth it's a lot of money
 doe mij maar faders


yo yo I am looking for the Djm 1000 rotory kit Doc 1000 Rc if any one out there has one hit me up williamsdonald7555@yahoo.com
Some parts of this website require you to login. Using an account on DJResource has a lot of advantages such as:
Adding Content, getting Notifications, Like content, Downloading and Uploading Images and much more.
Create your account to get involved with the Community
Most visitors online this month : 1.134
Lifetime Pageviews since 2003 : 245.807.129