
Pioneer DJM-900nexus Mixer in the footsteps of the DJM-800
Submitted by LeadThis content is © 2011-2025 The DJResource
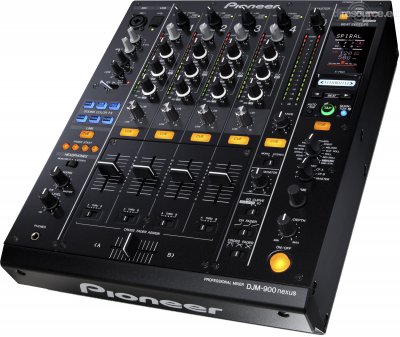
Pioneer DJ - Mixer Overview
Gearbase product details : Pioneer DJ DJM-900NEXUS
Pioneer launches their new Club mixer early 2011 and pushes the sound quality forward and continues in line with the rest of the DJM family by processing at 96kHz / 32-bit, using 24 bits AD converters and 32 bits DA converters. Pioneer again improved on the sound quality compared to previous mixers, making it Pioneers best sounding mixer yet.The DJM900nexus is designed to follow up the trail that was set by the DJM-800, expanding the features and adding USB and ProDJ Link connectivity. The DJM900nexus is Traktor Certified, meaning you can use their DVS system without using a box or time code disc, which saves a lot of time when you need to get started on a gig.
The DJM-900nexusnxs also supports the ON-AIR display (red Jog Illumination on CDJ2000) when a track is 'hot' (currently playing). This will warn you for accidental touches of the Jog Wheel.
The DJM-900NXS was also shortly available in White as DJM-900 nexus Limited.

Specifications
Channel Equalizers
Microphone Equalizers
Sampling Rate
96 kHz
A/D Converters
24 bits
D/A Converters
32 bits
Frequency Response
20Hz ~ 20kHz
Distortion
0.004 %
Signal to Noise Ratio line
107 dB
Signal to Noise Ratio phono
88 dB
Headroom
19 dB
Power Supply
AC 220-240V, 50/60Hz
Power Consumption
42 W
Dimensions
331 x 409 x 108 ( WxDxH )
Net Weight
7.1 kg
Input Specs & Terminals
??
Digital
4 x (RCA) / Coaxial
CD/Line
6 x (RCA)
Phono
2 x (RCA)
Mic / Sub Mic
1 x(Combi Phone/XLR)
?
1 x(Phone Jack 6.3)
Fader Start
4 x (mono mini JACK)
Return
2 x mono (Phone Jack 6.3mm)
Output Specs & Terminals
?
Digital
1 x (RCA) Coaxial @ 48kHz or 96 kHz
Master Out 1
1 x (XLR) +2 dBu / 600 Ohm
Master Out 2
1 x (RCA) +2 dBu / 10k
Booth
1 x (Phone Jack TSR Balanced)
Record
1 x (RCA) -8dBu / 10k
Send
2 x mono (Phone Jack 6.3mm)
Midi Out
1 x (5 pin DIN )
Headphone Monitor Out
1 x (Jack 6.3mm) +8.5 dBu / 32 Ohm
Channel Equalizers
?
Low Frequency
-26 ~ +6 dB @ 70Hz or Isolator
Mid frequency
-26 ~ +6 dB @ 1kHz or Isolator
high Frequency
-26 ~ +6 dB @ 13kHz or Isolator
Microphone Equalizers
?
Low Frequency
-12 ~ +6 dB @ 100Hz
high Frequency
-12 ~ +6 dB @ 10kHz
4 In - 4 Out Stereo USB Sound card
Inside the 900Nexus mixer are high quality soundcards that work at 96kHz / 24-bit high quality sound cards that can be accessed with a computer. With the Setup Utility you can use the computer to setup to sound card to make multi track recordings or use DVS software/discs. Look further on in this topic to see all the options and settings.All the sound cards can be used simoultaniously so you can make 4 track recordings of playback of any connected device independantly.
Setup Utility
You can download the most actual version of the Setup Utility from Pioneer's support website. This is also the place where you might find any drivers, firmware updates and other related downloads. You can also find here the updates for all your Pioneer DJ products for both Mac and Windows users. Setup Utility: Inputs Tab
This tab lets you see the selected inputs for each channel. There are no setting that you can make in this screen, it will only show how you have set up the inputs of the mixer. 
The selected input source for each channel will show up as a grey arrow for line/phono inputs/ the Line Inputs.
When you use one of the sound card (Line Input selector set to most right position: USB) the connection will show up with a colored arrow indicating that there is a digital signal flow.
 Setup Utility: Output Tab
If you want to make multi-track recording of a mix you can use this tab to setup what you are recording. The most common way is to record each channel and bounce all the tracks in post production. 
In order to do so you use the setting Post CH(Channel) Fader, this will stream the audio to your computer and includes all fader movements, Sound Color FX adjustments, X-Pad and Beat Effects
When you are using DVS (Digital Vinyl Systems) you can use the time code source of your choice (CD or vinyl) and send this signal to your DVS software. This saves you from connecting all sort of boxes when you need to hook up to a setup. You only need to connect your computer to the DJM900NXS via USB, check the source setup with the Setup Utility insert your discs and you're ready to go.
On the Output Tab you can also set the USB output level (default -19dB), this level setting only applies to audio that is coming to the mixer via USB, there is nothing altered to the audio level of digital/Line inputs.
Sound Color FX
This section of manual controlled effects was introduces on the DJM-800, later used on the DJM-700 and DJM-2000. The Color FX on the DJM-900NXS uses the best of all of them and even introducing new ones. First you select one of the Sound Colors with the blue buttons, it will now start to blink to indicate that the FX are activated. When you do not use the Sound Color FX in between the mixes you should learn yourself to switch this sections off (none of the buttons is blinking), this will avoid mistakes.Right above each Channel Fader is the parameter rotary for the Sound color FX, the center/top position is the neutral state where no FX is applied. When the rotary is rotated off the center this will apply the FX. The exact function of the parameter is slightly dependent of the the Sound Color FX that you are using (described below). The functionality of the Effects knob slightly changes for each Sound Color FX, the symbols below indicate which side to rotate to alter the parameter.
ProDJ Link
On the backside of the DJM900 you will find 1 LAN connector to hook up with your CDJs that support ProDJ Link (at this moment in 2010: CDJ-900 & CDJ2000). There is only one LAN connector so when you need to connect more than one player (which will often be the case) you need to setup a small ProDJ Link network by using a network switch or hub.A network switch and a hub do roughly the same, they split up a network connection. How they do it is completely different, a hub basically splits the signal while a network switch send the packages to all connected gear by turns.
If you have a choice always use a switch instead of a hub, this increase reliability and stability. Also don't save money by buying the cheapest you can find, investing in a decent switch will payback for itself at the end. A good network switch might cost around 30 euro, less than 1,3% of the price of the mixer. Here is an example setup using CDJ2000s and the DJM-900nexusNXS :
Beat Effects
This sections of effects is linked to the BPM of the audio that is detected with the Channel Selector. You can choose each channel independently, one of the sides of the Cross Fader (A/B), the Mic or the Master signal. The BPM can also be tapped with the TAP Button, or adjusted by keeping the TAP Button pressed and simultaneously rotating the Parameter knob.When the DJM-900nexusNXS is connected with the ProDJ Link to a Player the DJM can also sync the Beat Effects to the Beat Grid of the track that is playing on the selected channel. By using Rekordbox software to manage your tracks you gat the best out of the Beat Effects.
Once the Quantize function of the Beat Effects is activated the timing of the Beat Effects will follow the Beat Grid even when it it changed, the timing will change instantly on your move. This will gain you a lot more possibilities to create energy in breaks. You can change the timing for the Beat Effects with the arrow buttons just below the display. Pressing one of them will change the time 1 step (i.e.. 1/2 to 3/4), but you could also rotate the parameter knob and change the timing per millisecond.
X-Pad
The X-pad essentially toggle the Beat Effects temporarily on and changes the quantitative parameter of the effect. If you want to hold the effect with the X-pad activated, switch the effects on with the illuminated yellow button wholly you press the X-Pad.
Range : 1/8 - 16/1 or 1 - 4.000ms
Level/Depth controls the balance between the original and delayed sound.

Range: 1/8 - 16/1 or 1 - 4.000ms
Level/Depth controls the balance between the original and echoed sound.

Range: 1/8 - 16/1 or 20 - 4.000ms
Level/Depth controls the balance between the original and spiraled sound.

Range: 10 - 90% or 1 - 100%
Level/Depth controls the balance between the original and reverbed sound.

Range: 1/16 - 16/1 or 10 - 16.000ms
Level/Depth controls the balance between the original and toggled sound.

Range: 1/4 - 64/1 or 10 - 32.000ms
Level/Depth controls the intensity of the Filter.

Range: 1/4 - 64/1 or 10 - 32.000ms
Level/Depth rotated clockwise increases the intensity of the Flanger.
Level/Depth rotated counter clockwise controls the balance between the original and the flanged sound.

Range: 1/4 - 64/1 or 10 - 32.000ms
Level/Depth rotated clockwise increases the intensity of the Phaser.
Level/Depth rotated counter clockwise controls the balance between the original and the phased sound.
Range: -100% - 100%
Level/Depth controls the balance between the original and robotic sound.
Range: 1/64 - 4/1 or 10 - 4.000ms
Level/Depth controls the balance between the original and melodic sound.
You need to connect an external device or selecting this will result in no audio output. The DJM900 suspects the signal to be returned back to the Return bus, not doing so will not complete the loop.
Range: MIDI 0 - 127
Level/Depth has no functionality.
The DJM-900nexusNXS creates a MIDI (Musical Instruments Digital Interface) sweep that is synced to the BPM and has a length of the select timing in the display (i.e.. 1/2 or 2/1). The MIDI value sweeps from 0 to 127 and back again within this time. This signal could be used to trigger external effects in computers software of musical instruments. The sweep pattern switches each time the LFO FORM button is pressed.

Range: 1/16 - 16/1 or 10 - 4.000ms
Level/Depth rotated counter clockwise controls the balance between the original and rolled sound. Rotating clockwise past the top position has no function.
There are 3 different Roll Effects but they all work the same way, the difference is how the DSP creates the Roll. A Roll is basically a short sample of the length that is selected. It's like using a Loop on the CDJ but with the difference that while the Roll is playing, the tracks continues playing.
Roll: normal (forward) looped sound
Usage of the Roll
If a Roll is recorded and it is playing back, you can use the Channel Assign rotary to select another channel. The playback of the Roll will now be played on the newly selected channel while you also hear the audio of the current track. You can use the Sound Color FX on the Roll that is playing and the Channel Fader to control the volume. You can not use the Equalizers or Trim of the Rolled sound. Microphone
Two microphones can be used at the same time. Mic 1 connects to the Jack/XLR combo socket in the top left corner of the DJM, Mic 2 connects (Jack) to the back of the DJM. Both microphones have individual level controls.
 Microphone
The two way Equalizer controls offer control for the lower (100Hz) and higher (1kHz) frequencies and works for both Mics. The Talk Over function reduces the level of all channel other than the Mic with -18dB (default setting) when a signal is detected on the microphone exceeding -10dB. The Talk Over works can be selected in the Setup Menu, the default setting is Advanced.
The Advanced Talk Over mode only reduces the volume of the frequencies in the middle of the frequency range so that the high and low frequencies stay in tact so the vibe on the dance floor is not lost.
The Normal Talk Over reduces the volume of all frequencies at the same level. This will also lower the volume of the basses so your voice will be much easier to listen to. The reduction level of the Talk Over can also be set in the Setup Menu.
Setup Menu
The DJM-900nexusNXS has a Setup Menu that allows you to make some settings. You can enter this menu by keeping the Utility button (top right) for over 1 second. Use the Arrow Buttons to selects a setting. Press TAP to adjust the setting with the Arrow buttons. Press TAP again to store your change. Pressing the Utility button will close the setup Menu. Here are the things you can adjust in the Setup Menu. Channel Equalizers
Each Channel has it's own set of Equalizers that control the level of the High, Mid or Low frequencies. The range of the Equalizers is -26 to +6dB. The range can be changed so that it acts like an isolator. Channel Equalizers
To change the range of the Channel EQs from -26 to -indefinite you use the switch in the lower right corner of the mixer. When -indefinite is chosen the lo, mid or highs can be killed until total silence.
The frequencies of the EQs are the same as in Pioneer previous mixers.
?
P-Lock Fader Caps
 This is a new technique for Pioneer that should keep the fader caps at it's place during rigid use. DO NOT try to pull of the cap without removing the safety, it is locked and you will break one or more parts.
To remove a fader cap you need to gently remove the lock, The white stripe on the cap is actual a small white plastic part that keeps the fader locked to the mixer. As this is not a symmetrical part it's easier to lift the left side than the right side.
The LEFT side is the side you want to lift with a small thin item, in this picture I use the smallest screwdriver I could find. Be careful as the part is spring loaded and ejects when you lift it so you do not loose or break this part.
Once the lock is removed you can remove the cap like you use to. On the fader is still a small grey part attached, this can be removed by sliding it to the right.
If you would replace a fader and need to remove the fader faceplate, you need to repeat this for all 4 Channel Faders and the Cross Fader.
Solid Fader System
 The fader itself is build of 4 main parts: a black casing with the sledge and a metal plate with the actual fader component attached to it. This is a solid system that can be serviced easily if it might be needed. And let's be fair, as the mixer is the workhorse of the DJ Booth each mixer needs it's service once in a while?
The Pioneer DJM-900nexus is equipped with new faders that have similar mechanical characteristics closely related to the cross fader of the DJM-909. It features the same kind of steel bars that guide a small sledge. That on it's turn moves the actual fader.
The fader is placed under a 90 degrees angle in a container that would catch dust, liquids etc that might enter through the fader opening. Off course it should always be avoided that liquid enters electronically equipment, and this only acts as a safeguard to protect the other electronics inside the mixer.
Nice thing for the ones that do repairs, you can use your normal small Phillips screwdriver again to unscrew the faders from the body of the DJM.
The Fader Curve can be adjusted with a switch (lower right corner) in 3 modes: straight, logarithmical and halfway in between.

What do you think about Pioneer DJM-900nexus ??
Vote :
Gearbase

This content is © 2011-2025 The DJResource...
OK we understand you don't like ads (so don't we) but,
Please consider making this website possible by disabling your Ad Blocker.
Or become a Gold Member, they don't see ads.
Please consider making this website possible by disabling your Ad Blocker.
Or become a Gold Member, they don't see ads.
There are 14 Comments
Heb ik nou geen last van op mijn DJM700. Maar mooi bedacht. Hufterproof dus
Ik heb het een keer gehad op een DJX-700, zo de fadercap het publiek in 
BennoRevelli wrote on 27-02-2011 @ 00:39
ben erg benieuwd naar de Nexus! kan niet wachten om er mee te experimenteren
Is die multitrack recording pre of post eq ? Ik denk post als ik het zo lees.
De multi track recording is, zoals beschreven in het topic, post fader. Je neemt dus ook alle fader bewegingen (en CFX filters en BPM effecten) op. Net zoals de EQ instellingen overigens...
ziet er goed uit !! een mooie opvolger van de DJM 800 zou ik zeggen?


al de eergehad hier 3 keer op te draaien, schitterend mengpaneel!
misschien het meest awsome is toekomen op een feest en ipv mijn timecode setup te installeren gewoon ??n enkele USB de DJM900 in en klaar is kees om direct met traktor timecode te gaan draaien!
misschien het meest awsome is toekomen op een feest en ipv mijn timecode setup te installeren gewoon ??n enkele USB de DJM900 in en klaar is kees om direct met traktor timecode te gaan draaien!
Kisk wrote on 25-08-2011 @ 19:51
Dus als ik een keuze moest maken tussen de DJM-2000 en DJM-900, welke zou ik dan moeten nemen?
Zelf weet ik dat de DJM-2000 over een soort van ingebouwde EFX-1000 bezit... Maar de 900 Nexus lijkt mij gebruiksvriendelijker aangezien ik vaak op DJM-800's draai.
Ik bezit zelf over 2x CDJ-900's en een DDM4000 Mixer.
Jammer genoeg ondersteund de DDM4000 niet de PCLink van de CDJ-900 naar traktor, en ik denk dat de quantify effecten/loops een hele leuke toegevoegde waarde zullen hebben op mixes
this is a good mixer for me, nice effect and lots of function. the only downhill is the price :D
OK we understand you don't like ads (so don't we) but,
Please consider making this website possible by disabling your Ad Blocker.
Or become a Gold Member, they don't see ads.
Please consider making this website possible by disabling your Ad Blocker.
Or become a Gold Member, they don't see ads.
Create your FREE ACCOUNT now !
Some parts of this website require you to login. Using an account on DJResource has a lot of advantages such as:
Adding Content, getting Notifications, Like content, Downloading and Uploading Images and much more.
Create your account to get involved with the Community
116 Users online: 31 Guests (85 Unknown)
Pages generated today : 7.543
Most visitors online this month : 1.134
Lifetime Pageviews since 2003 : 245.809.032
Most visitors online this month : 1.134
Lifetime Pageviews since 2003 : 245.809.032