Record your mix with Computer General instruction set to start recording Nederlands
Submitted by Lead This content is © 2006-2025 The DJResource
What you need
MiniJack to RCA Cable
To record a mix from a mixer you need to run a cable from the mixer's output (preferably the Record output) to the computer. This cable transfers the audio signal from the mixer to the computer.
Recording software
On the computer you would need to run software that is capable of recording your mix such as: Adobe Audition, Audacity(free), Wavelab, etc.
The Cable
What kind of cable
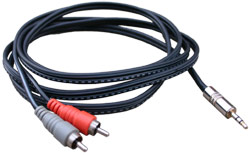
You would need a cable with 2 RCA sockets on one side and a 3.5mm MiniJack on the other end.
Such a cable can be bought in many electronics stores, but you can also make one yourself, I'll show you how to make a cable like the one you see here.
You can use this cable to connect lots of portable gear as well like iPods, walkmans, MP3 players or PDA's to audio devices with a RCA input. Off course this depends on the features of your portable device and your other hardware.
Make a MiniJack to RCA Cable
This cable has 2 cinch connectors for left and right on one side, also known as RCA connector (after it's founders: the Radio Corporation of America). The other side has a stereo 3.5mm (1/8 inch) mini jack plug that can be plugged into your computer.
To make a cable you would need the parts but also the capabilities of soldering wires, if you have no experience with this at all this might be a bit of a tough thing to do.
Soldering
Soldering is a method of connecting metallic materials using an additional melting metal, if necessary with the assistance of a flux. The melting temperature of the solder must lie beneath the minimum melting temperature of the base metals being connected.
Solders for copper and silver are traditionally a mix of tin and lead and have a melting range 178-215°C, depending on the exact composition of the alloy.
My preferred tool is a soldering welt, a good brand is Weller that has a recognizable light blue color but I'm sure each country has it's brands of tools.
Prefab RCA to RCA Cable
I used an existing RCA cable and cut of one side at the desired length. This saves some time as it has RCAs attached to each side. So I cut off one set op plugs and had an RCA cable with open ends.
This cable can also be made from scratch but I choose to save some time by using a prefab one that I cut one end off.
Strip & Twist
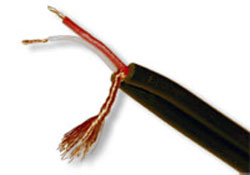
First disassemble the new 3.5mm plug and slide the cap over the open ends of the cable. Do this in the right direction, the threads should be at the open side where the plug will be mounted.
Then strip off the ends (about 15mm) of the wire. Each wire exists of a ground shield and a thinner wire with the signal. Be care full not to damage the wires of the ground shield in the cable.
Separate the lead from the wires of the ground shield. Twist both grounds (left and right) together.
Strip the little wires about 5mm from the end and also twist the copper wires.
Apply solder to the twisted ends
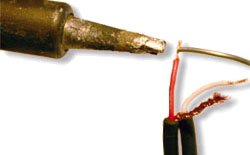
The correct way to solder the ends is to touch the bit you want to have soldered with the solder wire. The touch that same point from the opposite direction with the soldering welt.
This way you force the wire to heat up first and pass the heat on to the tin. Once the melting point of the solder is reached, it will be sucked into the copper wires.
Enough is enough
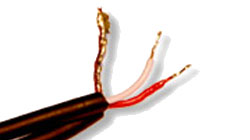
Don't put a big blob of tin on the wire, it needs to be only a little bit at the ends. This is only to prime the wires.
Make sure that you keep some copper clear from solder just before the insulation. This keep the wires more flexible and prevent it from breaking off.
How to connect the plugs
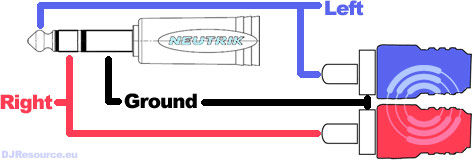
In this simple schematic overview you see that the connection is made with 3 wires: Ground, Left signal and Right Signal.
Left and Right share the same ground, in the 3.5mm mini jack they are both connected to the same contact. The ground is connected to the sleeve, the right signal to the ring and the left signal to the tip of the Jack connector.
Mounting the 3.5mm connector

Just as with the wires, you also should apply some solder on the places on the connector where you are going to mount the wires. This will make the actual welding a lot easier.
Attach all the signal and ground wires to the proper place. Mount the wires on the inside of the connector to avoid short circuiting it with the housing when you close it.
After you've closed the connector, double check with a multi-meter if you didn't make any short circuits.
The Connections
Connect to mixer
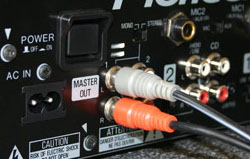
The side with the RCA/Cinch connectors goes into the Master. Use preferable a Record output, if your mixer does not have one you can also use the Booth or Record output.
You can use any output of the mixer to record. The Record Out would be the best because the level of this output is independent of the setting of Master or Booth volume.
Connect to Computer
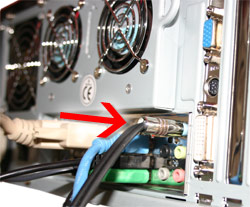
The mini jack connector goes into the signal input of your computer. You can do this on 2 ways: the build in sound card of your motherboard, or you can use the input on your sound card.
Using the sound card is recommended as it is most likely of better quality (check your manuals to find out what's best for your situation). The line input is often marked with blue if you have a PC.
If you are using a Mac, they often have a MiniJack connection build in. The function of this port can be changed in the System Preferences if needed.
Recording Quality
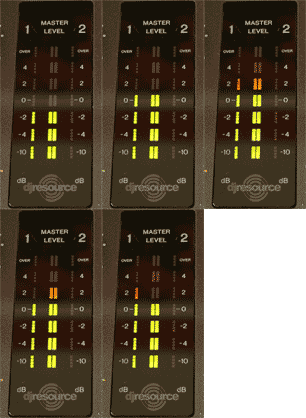
A good recording starts with good source material, only use good quality music files (320kbps MP3 or WAV/AIFF).
Recording at the right level is one of the most import discipline to master.
When you record at a to low level you might hear the noise floor. Also if you record the sound at half level you're basically recording it at 8-bit instead of the 16-bit that your CD will be able to play.
You want all your levels as loud as possible, without clipping it (don't show red LEDs).
Each channel should have signal peaking at around 0dB, use your gains/trims to adjust this on the Audio Mixer. Your Equalizers (Low, Mid, High) should be at center position to get a neutral recording.
Recording Software
There is no better or worse recording software, it more the way it works and the amount of features/effects come with it. And whatever software I might like now, by the time you are reading this that software might no longer exits.
Here are a few of your options:
- Free : Audacity
- I Prefer : Adobe Audition
- Steinberg Wavelab
- Sound Forge
- Free CD Ripper : Exact Audio Copy
Post Editing of Recording
You still might want to edit some things of your tracks like stripping off the excess spaces at the begin and end of the mix or track that you are digitizing. When you rip your 12" you first start the recording, then play the record and when the record or track has ended you stop the recording. This will give you some noises and/or white spaces before and after the audio.
With any audio edit program you can perform this action.
In some cases you might want to try to work on the level of the audio, there are 3 main things you can do about it. They might sound alike at first but there are some key differences.
There is no one plan of attack for everything, every recording is different and might have different things that need to be addressed, you have to decide yourself what works best for your situation.
Normalize
Most waveform edit programs offer some form of a Normalize feature. This will automatically measure the loudest sound in the track and set that as the maximum level. There will be no messing around with you track.
The only thing a Normalizer would do is amplifying the volume to the required level. You should generally set this just below 0db (-0.1db). When keeping the level to low will make you might hear more of the noise floor, if the level gets past 0dB : digital clipping will occur and that awefull sound you surely want to avoid.
Compression
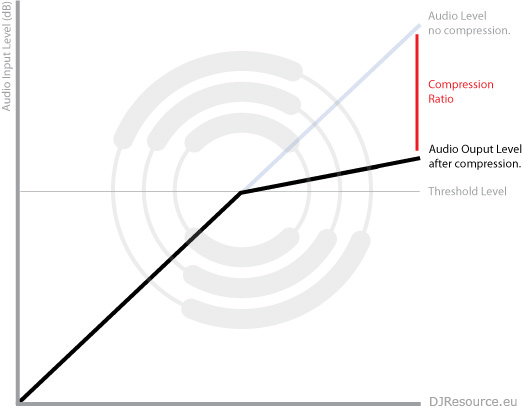
When you compress audio you are limiting the dynamic range when a certain level (Threshold) is exceeded. The level of compression is set by the Ratio. Signals that stay below the threshold level will not be processed and left unchanged.
A typical ratio that works for lots of applications is 2:1. When the input level increases with 2 dB (Decibels), the output is increased with 1 Decibel (dB).
Decibels are measured on a logarithmical scale. So if a sound level increases with 3dB the loudness will be doubled.
Limiting
Technically speaking limiting is the name for compression with a very high ratio. Although there is no real definition of the point where compression turns into limiting a ratio of more than 10:1 is considered as hard limiting.
When compression is complied with a low ratio (less than 10:1) we generally speak of soft limiting.
What do you think about Record your mix with Computer ??
Please consider making this website possible by disabling your Ad Blocker.
Or become a Gold Member, they don't see ads.
There are 13 Comments
p.s. what is the best way to "erase" clipping? i did a mix and when tracks played together (i mean when their beats matched) clipping occured... i couldnt hear it during the mix but when i finished it was clearly there... i use Soundforge and Adobe Audition... Which filter should i use to totally remove clipping? thx in advance!


ik zou graag een aankondiging opnemen via mijn microfoon, maar kent er iemand een programma waarmee je het opgenomen bestand kan bewerken??
Please consider making this website possible by disabling your Ad Blocker.
Or become a Gold Member, they don't see ads.
Some parts of this website require you to login. Using an account on DJResource has a lot of advantages such as:
Adding Content, getting Notifications, Like content, Downloading and Uploading Images and much more.
Create your account to get involved with the Community
Most visitors online this month : 356
Lifetime Pageviews since 2003 : 243.119.321

