
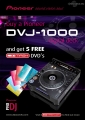
Pioneer DVJ-1000 DVD/CD/MP3 player with audio and video outputs
Submitted by LeadThis content is © 2006-2025 The DJResource
Pioneer DJ - Video Overview
Gearbase product details : Pioneer DJ DVJ-1000
The Pioneer DVJ-1000 is the brother of the famous DVJ-X1, the latter introduced
mixing with DVD to the big audience. Since than there has been a lot of changes
in the music scene. More and more DJ's are using DVD nowadays as a part of for
their complete performance.The content a DJ would play on the DVJ is getting better available nowadays with companies like MixMash and CD Pool. These companies release new DVD's on a monthly base in a wide variety of musical genres. Now with the DVJ-1000, mixing with DVD becomes within range of DJ's that want to add an extra dimension to their performance, and so supplying a way to stand out in the crowed. The DVJ-1000 is loaded with features that are known of it's small brother the CDJ-1000mk3.
Most parts of the DVJ-1000's feature-set are features that you might already know of previous products (DVJ-X1 and CDJ-1000MK3). The DVJ1000 combines the best of both worlds and add some new stuff.

Specifications
Product Type
DVD Digital Audio/Video Player
Type of Discs
12cm
Disc Format
MP3CD MP3DVD , CD, CD-R, CD-RW, DVD, DVD-R, DVD-RW
Frequency Response
CD : 4 Hz ~ 20 kHz
DVD:4 Hz ~ 44 kHz (@ 96kHz)
DVD:4 Hz ~ 44 kHz (@ 96kHz)
Distortion
0.004 % (JEITA)
Total Harmonic Distortion
115 dB
Composite Master
1x RCA, 1x BNC
S-Video Master
1x 4 pin mini-DIN
Composite Preview
1x RCA, 1x BNC
S-Video Preview
1x 4 pin mini-DIN
Audio Outputs
1x Stereo Analogue
1x Digital RCA
1x Digital RCA
Power Supply
AC 220-240V, 50/60Hz
Power Consumption
40 W
Dimensions
320 x 408 x 109mm ( WxDxH )
Net Weight
5.4 kg
Accessories
Operating Manual, Power Cord, Control cord, Forced Eject Pin
Connect the DVJ-1000 via the digital Audio connecter when possible
to retain as much of the audio quality as possible !
to retain as much of the audio quality as possible !
24-bit/96kHz Technology
The DVJ-1000 is fully digital and upscale's the audio from CD to 24-bit/96kH for internal processing. This is also the format of the Digital Output. So when connected to a DJM with digital input the complete flow of audio is kept 24-bit/96kHz until it reaches the output of the mixer (and even that could be done digitally).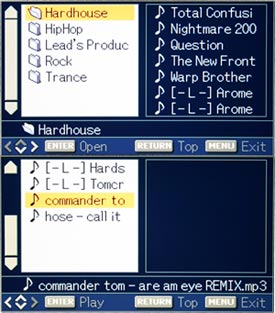
MP3 playback is enhanced
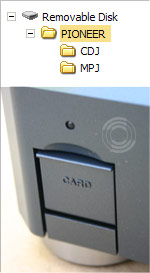
It's now also possible to play MP3 music from DVD-R. All thought 1000 tracks per disc is the limit, I doubt that more is needed. Nearly all formats in a variety of bitrate is supported (CBR & VBR).When used with a preview monitor, you can browse very easy through the folders on the disc.
For quick navigation you use the DVD Title/MP3 Folder skip buttons to navigate through the folders. Use the regular Track Search buttons for navigation inside a map.
To keep things easy for yourself try to have only folders in the Root Folder of the disc. When the DVJ-1000 is connected to a preview screen you can navigate with the navigation button and use Enter to confirm.
Supported Media Formats
MPEG-1
Audio Layer-3 sampling with frequencies 32 kHz, 44.1 kHz, 48 kHz
and a bit rate from 32 Kbps to 320 Kbps.
and a bit rate from 32 Kbps to 320 Kbps.
MPEG-2
Audio Layer-3 sampling with frequencies 16 kHz, 22.05 kHz, 24 kHz
and a bit rate from 16 Kbps (stereo) to 160 Kbps.
and a bit rate from 16 Kbps (stereo) to 160 Kbps.
ID3-tag
Versions 1.0 / 1.1 / 2.2 / 2.3 / 2.4. Display will show Title, Album and Artist information.
Only alphanumerical and a limited number of symbols will be displayed.
Only alphanumerical and a limited number of symbols will be displayed.
Disc and File Formats
File Extensions
.mp3, .MP3, .mP3, .Mp3
Folders layers
Max 8 layers deep
Max Folders
99 + Root
Max Files
999 per folder
Multi-session
Not supported, only the first session can be played.
CD-R recording
ISO9660 CD-ROM file system, Disc At Once or Track At Once
Pal & NTSC
DVD's made for the European market are made conform PAL video standards, discs made for the American and Japanese territories are made conform NTSC video standards. Because other specification of the outputted video signal it is important to know in which format your DVD is recorded. Usually this is mentioned on the outside of the disc.You should be able to read it without purchasing the discs. Besides a DVD-player, also the display monitors, TV-sets or plasma screen is setup for a specific standard. Both must match so your display equipment displays the video in a proper way.
To overcome problems the DVJ-1000 has a build in PAL/NTSC converter and with the player you can select what standard it uses on the outputs. The selected video standard is shown in the main display in the lower left corner.
 Setting PAL/NTSC Output
You can change the video standard that is used on the output of the DVJ-1000. The changes always follow this order each reboot : PAL -> AUTO -> NTSC -> PAL -> ...
To alternate this, turn off the DVJ first. Hold the DVD Title/MP3 Folder '>' button while you turn on the DVJ and hold it until the standard which will be used is displayed in the display.
Jog Feeling Adjust
Just like on the CDJ-1000MK3 you can set the resistance you feel when using the jog. When the dial is set all the way to the left it resembles the feeling of the CDJ-800. When rotated to around '10-past' (as in the image), you have a feeling that comes very close to that of the CDJ-1000MK2.
Hot Loop & Cue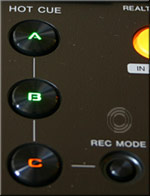
The A, B and C buttons on the left back end of the machine are used for the Hot
Cue/Loops. With the Rec Mode button you can toggle the functionality of these
buttons. When in Rec Mode, the letters will illuminate red to mark that they
are ready to record a new Hot Cue or Loop Point. A Cue point will be recorded
in all situation. To record a Hot Loop the DVJ must be in Loop Play mode when
you press any of the three letters while they are illuminated red.To recall and use any of the Hot Cue/Loops, toggle the Rec Mode so that the letters A,B and C are green or yellow illuminated. A yellow light indicates a stored Loop and a green light indicates a stored Cue Point. The Hot Cue/Loop will instantly start after pressing any of the Hot Cue/Loop buttons when the DVJ is in Play Mode, it will hold at the Hot Cue/Loop point when pressed in Pause Mode.
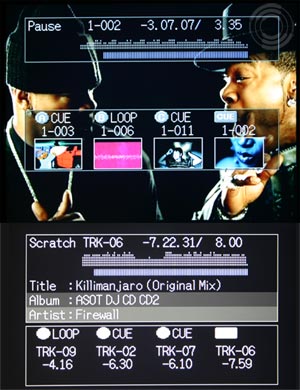
Onscreen Display
When the DVJ-1000 is used in conjunction with a preview monitor (connected to the DVJ), you have more overview of what is happening. The on-screen information on the preview monitor can be turned off by pressing the DISPLAY button.The on-screen information on the top of the screen shows you Track information (number, time remaining, time) and the Waveform / Memory Card information.
The bottom section shows in CD and DVD mode the same information, it only looks different.
When a DVD is played, each of the Hot Loop/Cue's shows a thumbnail of the video frame so mistakes should not be made easy.
When a CD is played the Track number and start time of the Hot Loop/Cue point is show for each (Hot) Cue/Loop.
Loop
A loop is a never ending rehearsal of a part of a track or CD and is played until the Reloop/Exit button is pressed. The start (Loop In) point is set by pressing the Loop In button or setting a regular Cue Point. The Cue Point is used as a start point when no specific Loop In point is set.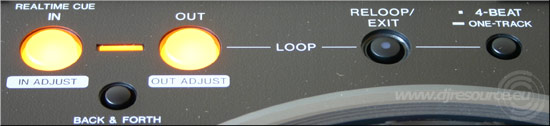
Loop Adjust
To adjust the Loop In or Out point you have to press the Loop In or Out button while the DVJ is in Loop Play mode. This button will start to flash, indicating you can now set this point to a new location using the FFWD/REV buttons or the Jog. The touch sensor's functionality is disabled during Loop edit.Loop Back & Forth
This is a brand new feature and performs a specialized loop playback. When you play a loop from DVD the audio sounds good, but the video tends to skip when the loop is restarted. Back & Forth now comes in action by playing the loop reversed every other time. When activated a little bar lights up just above the Back & Forth button.
Reloop
After you've exited a loop with the Reloop/Exit button, it is kept in the memory. As long as the Reloop/Exit button is illuminated, a loop is ready to be recalled directly when the Reloop/Exit button is pressed.4-Beat/1-Track
This feature loops a piece of 4 beats automatically when pressed. When pressed a Loop In point is set, after 4 beats a Loop Out Point will be set automatically. When you keep this button pressed the DVJ will perform a 1-Track loop, looping the complete track from start to end.For use with CD this might seem like not such a big issue, but when you're involved in the creation process of looped video content this is something that makes life easy. Instead of looping the video before you burn it, you now only need to create 1 loop sequence which you can easy Play as a 1-track loop. When the video content is created accurately this will make life at the stage very easy.
Faster Searching using the Jog
When you are holding the Track Search buttonWhen you hold down the regular Search button
In both cases (track or regular search), it doesn't matter which of the Search Buttons you press (
SD/MMC Memory
Just like on DVJ-X1 and CDJ-1000MK3 you can store several things on the Memory Card : All waveforms, 100 Cue Points per disc and 3 Hot Loop/Cue's. The waveforms are written to the Memory Card automatically when they're completely read. Also the last 3 used Hot Loop/Cue's are stored. The total number of disc's you can store depends on the type of disc (CD, DVD or MP3), the number of stored points per disc and the size of your Memory Card.Use an SD Memory card instead of an MMC. On an MMC card you CANNOT store DVD points, MP3 loops and Cue's.
Using the Memory
If you want to store anything on the Memory Card you only have to press the little black MEMORY button, that Cue Point or Loop is directly stored on the Memory Card for later use. This will be shown to you shortly in the display. Also a little red marker will appear on the main display, just above the playing address bar.To remove a point from the Memory Card, you recall the point you want to delete and directly after that press the DELETE button. The display will show that a point has been deleted. When you recall any information from the Memory Card you need to decide what to do with it. You can store a Cue Point under the Cue button or the loop. But you can also record it directly on any of the Hot Loop/Cue 's.
 For CD usage
When a CD is used you only use the < and > button of the navigation button to go to the next or previous point on the Memory Card. Confirm your choice with the Enter button. 
You can see the stored Cue and Loop points as red markers above the playing address bar.
 If a DVD is used
The functionality for using the Memory card is more advanced when using a DVD. With each Cue or Loop that is stored, a thumbnail picture is made and stored with it on the Memory Card. You now need to navigate through your point using a preview monitor. There’s a video output connection for it at the backside of the DVJ-1000.
On the preview screen you will see al the thumbnail pictures that show the first frame of the video at the begin point. Navigate through them and select any point with the Enter button.
Main Display
On the main display you see all important information that you might need during your performance. The displays is mounted in an angle of about 20 degrees. Reading it is very comfortable. There is a lot of information on the main display :
Waveform
The waveform is the big pointy bar in the center of the display. This is a graphical presentation of the audio volume of the track. 100 pixels are used to give an accurate reading, the maximum height of a bar is 7 dots. This is the same Waveform as used on the CDJ-1000MK3 and has the same specifications.Audio CD's are read at about 6x speed. When DVD or MP3 music are played the Waveform read real-time, meaning the track has to play at least once for the full length to show the complete Waveform.
Jog Display
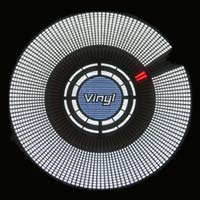
On the display that is mounted in the center of the jogwheel you have a visual marker for accurate Cue setting and scratching. When you set a Cue Point, that point will also be marked in the Jog Display by an orange marker. This reflects the stickers that scratchers use to mark the exact right spot... but now digital.The Jog display gives you also other information like: Vinyl Activated (blue disc in center), Memory Status (flashing of the outer white ring in the center) and the location of the playing address (circling gap)
Cue Stutter Continue
Just like on any CDJ you can use the Cue Button to sample play from your Cue Point. As long as you hold the Cue Button the CDJ plays the track from the Cue Point onwards. When the cue Button is released the CDJ instantly returns to the Cue point and is ready for a restart. Continue playing after you used the Cue Stutter was until recently impossible.Eject Canceling & Auto Resume Play
When you press the EJECT button, playback will stop and the player prepares for the Eject. Before it shows you 'EJECT' (about 1 second), you can cancel the Eject by pressing the Play Button. This will not stop the sound from stopping, but it continuous playing a lot faster than when it would perform a full Eject. When the disc does get ejected and is inserted it again, playback will continue from the point where it was ejected (track number and time is remembered). This point is being stored in the memory of the CDJ for as long as no other CD is inserted, or the power has been turned down.And there are also the already familiar features that you will find on about any CDJ, DVJ or CMX product:
"Wide" Pitch Control
The pitch control function has an incredible range of +100/- 100% for audio CD's and -100%/+70% for DVD and MP3 discs. When combined with the Master Tempo functionality of the DVJ the digital effect can be used to uplift your performance even more.
This pitch is more accurate if a smaller pitch setting is chosen:
+/- 6% : 0.02%
+/- 10%: 0.05%
+/- 16%: 0.05%
+ WIDE : 0.5%
The pitch control function has an incredible range of +100/- 100% for audio CD's and -100%/+70% for DVD and MP3 discs. When combined with the Master Tempo functionality of the DVJ the digital effect can be used to uplift your performance even more.
Master Tempo
This world-famous function locks the pitch of a track at 0 position, even when its speed is changed. You can speed up or slow down the tempo without any difference to the sound of vocals and instruments. The pitch-bends that you do while cueing up your track will be unnoticeable for the audience. This function also makes it possible to mix-in an accapella tracks to a beat at nearly any tempo, you can even pitch-bend the accapella without notice.Tempo Control
This 100 mm linear high-precision slider is connected to a adjustment indicator on the display panel to give DJs total control and ensure that tempo adjustment is easy and accurate. The accuracy declines when a higher pitch scale is selected, 0.02% (at +/- 6%). In the 10% and 16% range the accuracy is 0.05%. When the WIDE range (100%) is selected the accuracy is 0.1% which is small enough to do good mixing.Tempo Control Range
Ranges of +/- 6%, +/-10%, +/-16% and WIDE range (CD:+/- 100%, MP3: +70%/-100%) can be assigned to the Tempo Control slider to offer a greater range of adjustment than on any previous Pioneer CDJ deck.This pitch is more accurate if a smaller pitch setting is chosen:
+/- 6% : 0.02%
+/- 10%: 0.05%
+/- 16%: 0.05%
+ WIDE : 0.5%
Tempo Control Reset
Resets the tempo to 0% of the original tempo of the track, regardless of the slider’s position. The button has been recessed to prevent accidental selection.BPM Counter
Indicates BPM for the current track. The BPM counter also reads and displays the BPM when the player is in Pause. Without an headphone you can use it to cue up the tracks with an accuracy of 1 BPM, the rest is done with the headphones on your head.Reverse
Use this function to instantly set the playback direction in reverse without the loss of tempo or pitch. Reverse can also be used in combination with the Hot Cue and the Loop functions to create endless combinations and effects.Real Time Seamless Loop
Set a loop quickly and simple, while a track is play. Once set, it can be looped continuously until the Reloop/Exit button is used. When released, the track continues without a pause.To create a loop you press Loop-In and Loop-Out on the desired position on the CD. You can do this on-the-fly in real time, or you can use the jog/pause mode to get the exact position by editing the Loop In or Out Point.
Remember that the CUE point you set is the same as the Loop-In point. So you can also use the Loop-In button to set a CUE point on-the-fly.
Reloop
Hit the Reloop button for instant access to the beginning of the loop stored in memory of the player. This can be done while the loop is playing, or at any time during the playback of a track. The last Loop is always stored in memory until replaced with a new loop.Pitch Bend
Move the Jog Dial (in CDJ mode) forwards or backwards to either speed up or slow down the tempo of a track. When the player is in Vinyl mode only the outer ring of the jog gives you this feature, in CDJ mode all the jog behaves the same.Jog Mode
The player can be set in either Vinyl or CDJ mode. In CDJ mode, the Jog Dial still functions, but without the touch sensitivity. Advise : Use Vinyl mode only ! to gain most benefits of your deck.Auto Cue
This is the fastest way for DJs to find the first piece of audio of a track when activated. Also the level at which the Auto-Cue sets its point can be adjusted in a range of levels.Fader Start / Back Cue Start
A track on the deck can be started by sliding the cross fader out of the corner. A connection to a Pioneer (or supporting) mixer with the supplied mini-jack to mini-jack cable is required. Also Auto Cue must be Activated. Sliding the fader back will return the track to the cue point previously selected on the unit.Legato Link Pro
Pioneer’s wide range Legato Link Conversion technology delivers high quality audio by up scaling the sample rate of the sound. This regenerates the upper harmonics for best audio quality.Anti-Vibration
An oil-dampened floating suspension system prevents skipping, even when the player is subjected to impact during use or to vibrations generated by high volume music and/or low frequency bass.What do you think about Pioneer DVJ-1000 ??
Vote :
Gearbase


This content is © 2006-2025 The DJResource...
Random Images

OK we understand you don't like ads (so don't we) but,
Please consider making this website possible by disabling your Ad Blocker.
Or become a Gold Member, they don't see ads.
Please consider making this website possible by disabling your Ad Blocker.
Or become a Gold Member, they don't see ads.
There are 9 Comments


Op de vorige stond pioneer nog zo lelijk onderste boven dat heeft deze niet 
Mooi apparaat werk er nu 2 maanden mee
En nu maar wachten op de SVM-1000
En nu maar wachten op de SVM-1000
Wrm zijn ze eigenlijk van de dvjx 1 afgestapt? En zat er veel verschil tussen de dvjx 1 en de dvj 1000?
Hij is wel mooi en cdj 1000 mk3 met dvd functie.
Hij is wel mooi en cdj 1000 mk3 met dvd functie.
DVJ-1000 is de opvolger van de DVJ=X1.
Zoals bij alle opvolgers : sneller, beter, meer functies etc...
Zoals bij alle opvolgers : sneller, beter, meer functies etc...
Geweldig apparaat, keer op gedraait op een feest, we mochten ze LENEN als demo van een goeie vriend van me.
Super apparaten, alleen erg duur
Super apparaten, alleen erg duur
Jeahh..
deze werken overigens ook prima..
k draai er elke vrijdagavond op maar gevruik de dvd funktie niet dus ik draai aleen met cd's....
ff nog een vraagjee...
zit er ook een usb ingang opp/
deze werken overigens ook prima..
k draai er elke vrijdagavond op maar gevruik de dvd funktie niet dus ik draai aleen met cd's....
ff nog een vraagjee...
zit er ook een usb ingang opp/
Create your FREE ACCOUNT now !
Some parts of this website require you to login. Using an account on DJResource has a lot of advantages such as:
Adding Content, getting Notifications, Like content, Downloading and Uploading Images and much more.
Create your account to get involved with the Community
179 Users online: 135 Guests (44 Unknown)
Pages generated today : 1.341
Most visitors online this month : 897
Lifetime Pageviews since 2003 : 242.798.378
Most visitors online this month : 897
Lifetime Pageviews since 2003 : 242.798.378